Using Smart Attachments
The Smart Attachments feature of the iManage Share Plug-in converts email attachments in Microsoft Outlook to secure iManage Share document links. There are two ways to invoke Smart Attachments:
To invoke it manually, click Send with iManage Share in the ribbon bar, as shown in the following figure:

iManage Share Plug-in monitors all sent mails to detect emails containing attachments that exceed a certain threshold size and prompts you to send the attachments as secure links.
The size threshold is a parameter that can be configured by your administrator.
The total size of all attachments is used to determine if the threshold size was exceeded.
Your administrator can also configure the settings that enables you to send the attachments as secure links if the threshold size is exceeded.
When Smart Attachments is invoked, Smart Attachments dialog is displayed, as shown in the following figure:
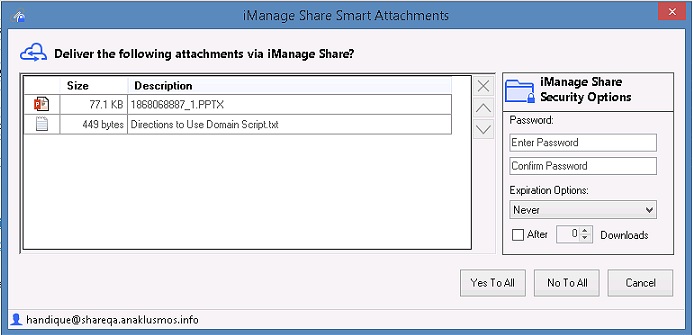
Set or change the password and expiration options for the secure links.
For more information on using password protection, expiration date, and download limit for the link, see Send a Secure Link to a iManage Work. The documents appear in the same order as the attachments on the email.
(Optional) Use and
and  to the right of the document list to reorder them.
Remove the attachments that you do not want to convert from the list.
The original attachment is sent, while secure links are used for the remaining items.Click one of the following options:
Yes to All: converts all the attachments listed to secure links, and applies your selected settings to all links.
The dialog closes and an email is sent, with secure links in place of any attachment listed in the Smart Attachments window.No to All: closes the dialog.
The attachments are not converted into links, and the email is sent with all the documents as attachments.Cancel: to close the dialog and return to the email.
If you click Yes to All:
The sent email is moved to a new folder called iManage Share Outbox until it is ready.
iManage Share Plug-in uploads the attachments to the Secure Sent Links folder.
If the upload was successful, the attachment is replaced with a secure sent link.
When the email is successfully updated, Smart Attachments completes the process by moving the email from the iManage Share Outbox to the Microsoft Outlook Outbox.
When the email is sent, Outlook moves it to the Sent folder.
A sample email is as shown in the following figure: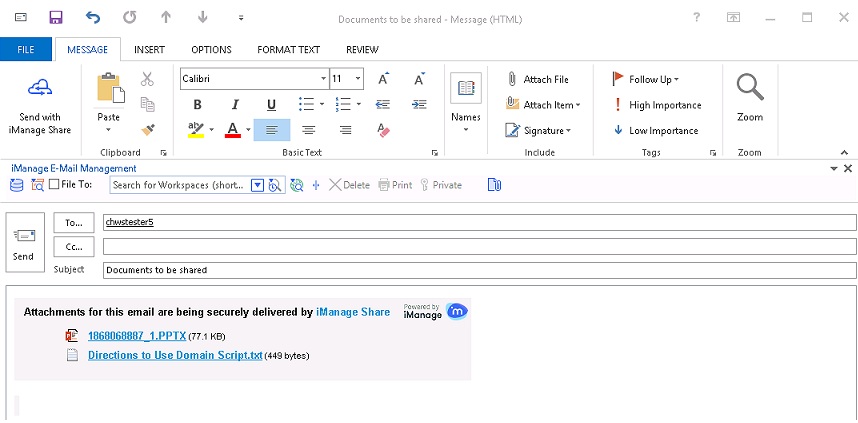
File Attachments to a Collaboration Folder
Attachments uploaded using the Smart Attachments feature are automatically uploaded to the user's Secure Sent Links folder. Alternatively, you can add them directly to a collaboration folder.
Using this feature, your email attachment becomes part of an iManage Share collaboration folder and is available to anyone with access to the collaboration folder. If the external party has access to the collaboration folder, they can get the document from your email link.
If this feature is enabled, an additional Filing Options is displayed on the Smart Attachments dialog, as shown in the following figure:
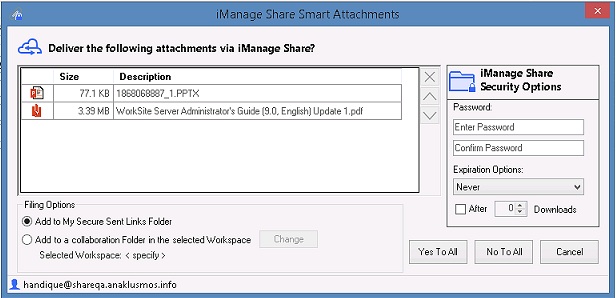
Filing Options
Add to My Secure Sent Links Folder: by default, attachments uploaded to iManage Share are uploaded to the user's Secure Sent Links folder, which is visible in the My Favorites node of the iManage Work tree.
This behavior is equivalent to what happens when the Save to Collaboration Folder feature is disabled.Add to a Collaboration Folder in the selected Workspace: attachments uploaded to iManage Share are uploaded to a specified iManage Share folder.
Filing a Document to a Collaboration Folder
Click Add to a collaboration folder in the selected Workspace.
If a workspace is not specified, the
 icon indicates that you must select a Workspace and its associated iManage Share folder.
Click Change to select the appropriate folder for filing the attachments.
After you specify a valid folder, the name appears as the Selected Workspace. The
icon disappears, and Yes to All is enabled.Click Yes to All to complete the operation.
Considerations before Filing to a Collaboration Folder
If the user has already indicated that the email must be filed to a particular workspace using the File to option on the iManage Work Email Management toolbar, then the Smart Attachments feature treats this as the workspace that must host the collaboration folder, and the selected workspace defaults to the workspace selected in the Email Management toolbar.
If the default workspace already has a collaboration folder with no sub-folders, it defaults to that collaboration folder.
If the default workspace already has a collaboration folder, but the collaboration folder has sub-folders, then the user must select the appropriate sub-folder for filing the attachments.
If the default workspace does not already have a collaboration folder, it creates one upon upload.
Since this is a new collaboration folder, only the workspace owner and the current user are added to the collaboration folder.
To add additional users after the file is created:Locate the newly created collaboration folder in your iManage Work tree.
Select Add or Remove iManage Share Plug-in users from the iManage Work client menu.
If the user does not have the required access rights to upload to the selected collaboration folder, the operation cannot be completed and the user must select the option Add to My Secure Send Links folder to complete the operation.
After the upload, the document is published with the password and expiration options you have set.
The recipient can access the link using the document password you provided, without authenticating to iManage Share or using an iManage Share account.